반응형
본 내용은 원문(https://docs.duendesoftware.com/identityserver/v7/quickstarts/js_clients/js_with_backend/) 내용을 참고하여 작성되었습니다.
(1) JavaScript기반 클라이언트로 사용할 프로젝트를 추가해 줍니다.
dotnet new web -n JavaScriptClient
이렇게 하면 빈 Asp.net Core 프로젝트가 생성됩니다.
(2) 다음으로 솔루션에 해당 프로젝트를 추가해 줍니다.
dotnet sln add ./{프로젝트경로}
(3) IdentityServer의 BFF관련 라이브러리들을 추가해 줍니다.
dotnet add package Microsoft.AspNetCore.Authentication.OpenIdConnect
dotnet add package Duende.BFF
dotnet add package Duende.BFF.Yarp
(4) IdentityServer의 Config.cs 파일을 열러서 Client를 새롭게 추가해 줍니다.
new Client
{
    ClientId = "bff",
    ClientSecrets = { new Secret("secret".Sha256()) },

    AllowedGrantTypes = GrantTypes.Code,

    // where to redirect to after login
    RedirectUris = { "https://localhost:5003/signin-oidc" },

    // where to redirect to after logout
    PostLogoutRedirectUris = { "https://localhost:5003/signout-callback-oidc" },

    AllowedScopes = new List<string>
    {
        IdentityServerConstants.StandardScopes.OpenId,
        IdentityServerConstants.StandardScopes.Profile,
        "api1"
    }
}
(5) 추가한 JavaScriptClient 프로젝트에 Program.cs 파일을 다음과 같이 수정해 줍니다.
using System.IdentityModel.Tokens.Jwt;
using System.Security.Claims;
using Duende.Bff.Yarp;
using Microsoft.AspNetCore.Authorization;

var builder = WebApplication.CreateBuilder(args);

builder.Services.AddAuthorization();

builder.Services
    .AddBff()
    .AddRemoteApis();

JwtSecurityTokenHandler.DefaultMapInboundClaims = false;
builder.Services
    .AddAuthentication(options =>
    {
        options.DefaultScheme = "Cookies";
        options.DefaultChallengeScheme = "oidc";
        options.DefaultSignOutScheme = "oidc";
    })
    .AddCookie("Cookies")
    .AddOpenIdConnect("oidc", options =>
    {
        options.Authority = "https://localhost:5001";
        options.ClientId = "bff";
        options.ClientSecret = "secret";
        options.ResponseType = "code";
        options.Scope.Add("api1");
        options.SaveTokens = true;
        options.GetClaimsFromUserInfoEndpoint = true;
    });

var app = builder.Build();

if (app.Environment.IsDevelopment())
{
    app.UseDeveloperExceptionPage();
}

app.UseDefaultFiles();
app.UseStaticFiles();

app.UseRouting();
app.UseAuthentication();

app.UseBff();

app.UseAuthorization();

[Authorize]
static IResult LocalIdentityHandler(ClaimsPrincipal user)
{
    var name = user.FindFirst("name")?.Value ?? user.FindFirst("sub")?.Value;
    return Results.Json(new { message = "Local API Success!", user = name });
}

app.UseEndpoints(endpoints =>
{
    endpoints.MapBffManagementEndpoints();

    endpoints.MapGet("/local/identity", LocalIdentityHandler)
        .AsBffApiEndpoint();

    endpoints.MapRemoteBffApiEndpoint("/remote", "https://localhost:6001")
        .RequireAccessToken(Duende.Bff.TokenType.User);
});

app.Run();
(6) wwwroot 폴더를 만든 후, index.html와 app.js 파일을 추가해 줍니다.
<!DOCTYPE html>
<html>
<head>
    <meta charset="utf-8" />
    <title></title>
</head>
<body>
    <button id="login">Login</button>
    <button id="local">Call Local API</button>
    <button id="remote">Call Remote API</button>
    <button id="logout">Logout</button>

    <pre id="results"></pre>

    <script src="app.js"></script>
</body>
</html>
function log() {
    document.getElementById("results").innerText = "";

    Array.prototype.forEach.call(arguments, function (msg) {
        if (typeof msg !== "undefined") {
            if (msg instanceof Error) {
                msg = "Error: " + msg.message;
            } else if (typeof msg !== "string") {
                msg = JSON.stringify(msg, null, 2);
            }
            document.getElementById("results").innerText += msg + "\r\n";
        }
    });
}

var userClaims = null;

(async function () {
    var req = new Request("/bff/user", {
        headers: new Headers({
            "X-CSRF": "1",
        }),
    });

    try {
        var resp = await fetch(req);
        if (resp.ok) {
            userClaims = await resp.json();

            log("user logged in", userClaims);
        } else if (resp.status === 401) {
            log("user not logged in");
        }
    } catch (e) {
        log("error checking user status");
    }

    document.getElementById("login").addEventListener("click", login, false);
    document.getElementById("local").addEventListener("click", localApi, false);
    document.getElementById("remote").addEventListener("click", remoteApi, false);
    document.getElementById("logout").addEventListener("click", logout, false);

})();

function login() {
    window.location = "/bff/login";
}

function logout() {
    if (userClaims) {
        var logoutUrl = userClaims.find(
            (claim) => claim.type === "bff:logout_url"
        ).value;
        window.location = logoutUrl;
    } else {
        window.location = "/bff/logout";
    }
}

async function localApi() {
    var req = new Request("/local/identity", {
        headers: new Headers({
            "X-CSRF": "1",
        }),
    });

    try {
        var resp = await fetch(req);

        let data;
        if (resp.ok) {
            data = await resp.json();
        }
        log("Local API Result: " + resp.status, data);
    } catch (e) {
        log("error calling local API");
    }
}

async function remoteApi() {
    var req = new Request("/remote/identity", {
        headers: new Headers({
            "X-CSRF": "1",
        }),
    });

    try {
        var resp = await fetch(req);

        let data;
        if (resp.ok) {
            data = await resp.json();
        }
        log("Remote API Result: " + resp.status, data);
    } catch (e) {
        log("error calling remote API");
    }
}
(7) 이제 IdentityServer와 API 서버를 실행한 뒤, JavaScriptClient 서비스를 실행합니다.

실행하면 위와 같이 4개의 버튼이 보입니다.
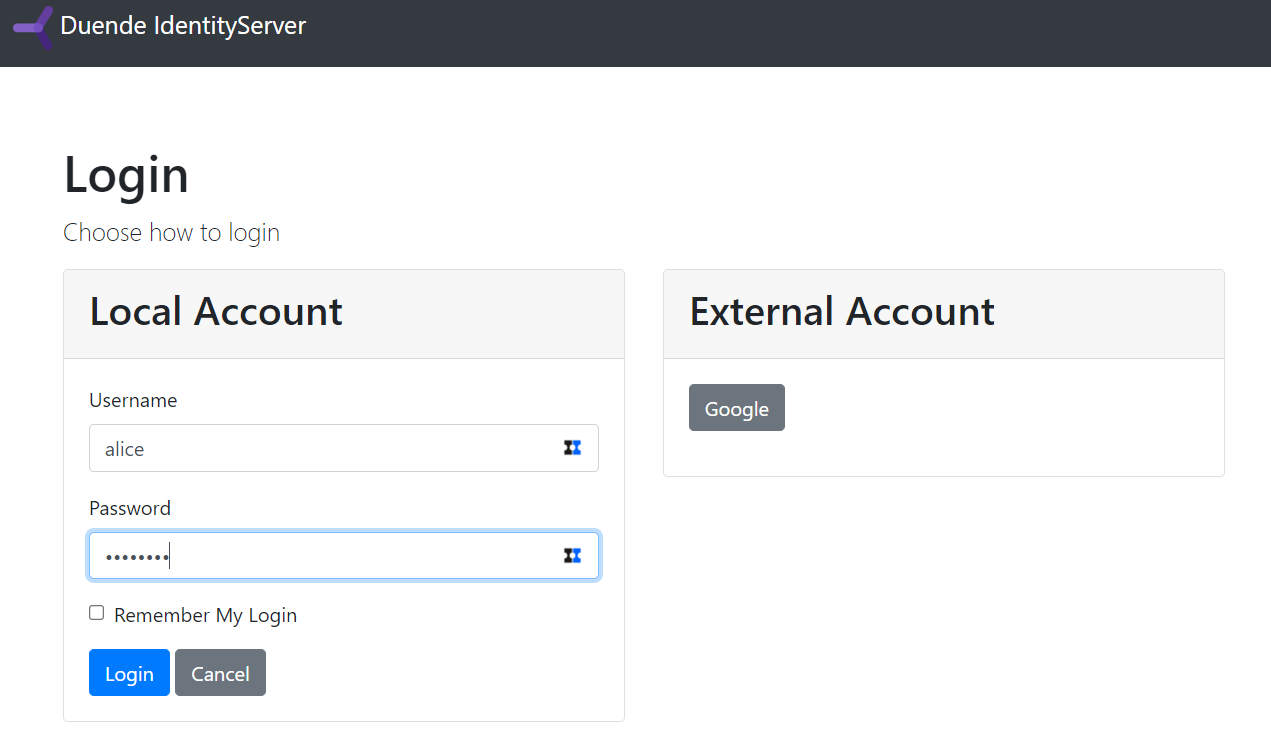
(8) 로그인을 시도하면 IdentityServer의 로그인 화면으로 이동합니다.

(9) 정상적으로 로그인이 되면 다음과 같이 로그인된 정보가 나열됩니다.

(10) 놀라운 건, 외부에 API 서비스를 원격으로 연결하는 기능인데, /remote라는 prefix를 추가해 주는 것만으로 해당 API 서비스를 연결할 수 있다는 것입니다.
반응형
'개발이야기' 카테고리의 다른 글
| IIS Express에 redirection.config 오류 관련 (0) | 2024.03.11 |
|---|---|
| IdentityServer 학습 #10 - BFF without backend (0) | 2024.03.11 |
| IdentityServer 학습 #8 - EntityframeworkCore (0) | 2024.03.07 |
| IdentityServer 학습 #7 - API access (0) | 2024.03.07 |
| IdentityServer 학습 #6 - OpenID Connect (0) | 2024.03.07 |